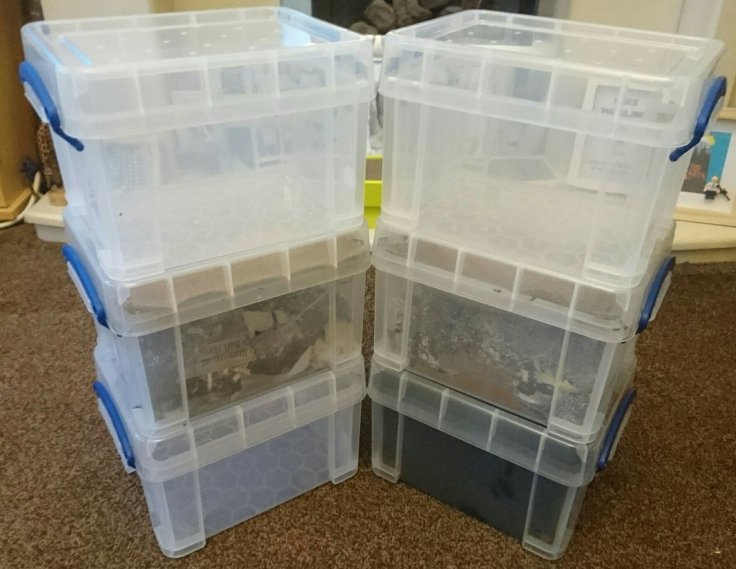
Today I ambled into town to buy some important things ready to make my wormery. I spent ages agonising over which plastic box would be best and ended up choosing a 3 litre box with clip on lid. I loved the design of one of the DIY wormery videos I watched on YouTube last night and decided to base my wormery on that. After stocking up on six of these boxes, I swung by Hobby Craft to pick up some hessian to make a blanket for the top of the wormery. I stopped off on the way home to pick up my drill and a few other tools before lugging it all down the allotment.

I dropped by the clubhouse to say hello to everyone. Apart from the cold, everyone was in good spirits and we all enjoyed a chat before heading off to our plots. I went to check on Emily before feeding our girls. She is still sitting on the eggs and looks comfortable. The broody box is spacious and warm despite the cold weather outside.

The other girls were happy to see me although they weren’t impressed by the lack of sunflower seeds. I really must pick up some more!

Before I started the wormery, I gave the plot a quick once over with Phil’s amazing hoe. It makes life so much easier!

So onto the main job of the day. The plastic boxes I had bought were clear but the worms need darkness as they are photosensitive. Trying to be clever, I had bought some black paint to paint the inside of the boxes. I waited in the freezing cold whilst they dried.

After they were mostly dried, I started to drill several holes in the bottom of the box. The cold had affected the plastic, making it difficult to drill. Eventually using a screwdriver, I sorted out the holes so that they were big enough to allow the box to drain any sump (worm juice). In drilling the holes, the paint started to peel off. I tried repainting it but it wasn’t working. So I cleaned it all off and went back to drilling holes in the lid.


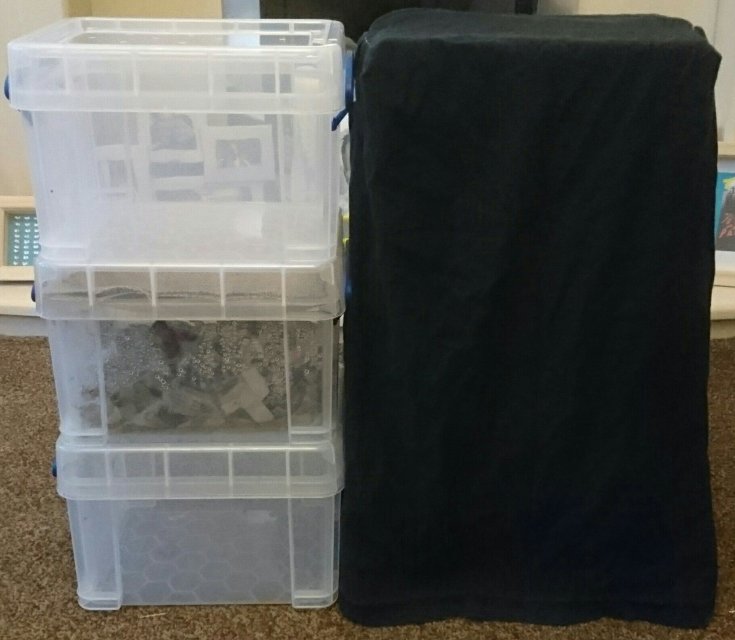
I cut a piece cardboard to fit the bottom of the box and added a layer of shredded newspaper on top. Next, I wetted the newspaper and cardboard as the worms prefer a damp environment.

I called Rachael and walked over to her house to collect some worms. She has a large wormery and generously let me take several handfuls of worm castings from a lower tray and a couple of handfuls from the active tray. I closed up the lid after putting on the hessian blanket.


With the black paint plan failing, I came up with a Plan B. If I couldn’t make the box black then perhaps I could make something to cover the wormery. I dashed upstairs to find two old black t-shirts and set about turning them into an oversized tea cosy. I folded in the neck and sleeves and sewed them into place.


Next I trimmed off the excess fabric and sewed up the corners before trimming off the corner. They are a bit rough, but I am quite pleased with the final result!


I have found a perfect place in the shed for both wormery towers. I have a spare box all ready to go when the worms have filled the first box with the castings which will take several months.

The key thing to remember is to keep the soil damp and not to put in too much food at a time. In order to stop the wormey from smelling, avoid putting in meat and dairy products. The worms shouldn’t be fed onions or citrus fruits as it makes the soil too acidic for them. It’s important that the worms aren’t exposed to extremes of heat or cold, but kept at a fairly consistent temperature.
So here goes the great worm composting experiment of 2019! Updates to follow!

Exciting! Look forward to seeing how it goes.
LikeLike
Me too! Luckily I have Rachael who is on hand to advise me!
There are so many videos online showing how to make them, all different styles. I made the second wormery in about 15 minutes once the drill had recharged! I recommend having a look.
The sump (worm juice) is a concentrated fertiliser – to use dilute it with water – and the compost which is extremely rich and will boost plant growth in small quantities.
Plus it gets rid if all those kitchen scraps and junk mail!
LikeLike
I think my children would love making one and observing it, but I would feel terrible if I killed the worms. It would be a good project for us though, so we will look at some tutorials, thank you.
LikeLike
There are child friendly packs but they are quite expensive. I used three Really Useful boxes but you could easily get away with 2.
Try these videos:
LikeLiked by 1 person
I’ve invested in two Bokashi bins this year for making compost for my allotment which like yours is very close to home (mine is a three minute walk away). Still filling the first bin so cannot say what the results are yet! I shall definitely be adding a wormery next year after reading your post and shall look at some YouTube vids too – thank you for sharing 🙂
LikeLike
Thank you for your lovely comments! If you look on one of the other comments on this post, you will see the links to my three favourite wormery videos. Hope they help!
I will be posting updates on my wormery towers once they have had a few days to settle in!
LikeLiked by 1 person
Thank you for replying 🙂 (I’ve just changed my username due to putting my craft blog on private a while a go so no longer blog for that one!) I shall look at the links you’ve provided so thank you for the pointer. I shall look forard to your updates and all the best with the wormery 🙂
LikeLiked by 1 person
P.S I shared your wormery post to my FB profile – I hope that’s ok to do so 🙂
LikeLike
Absolutely! I mainly write for myself but I am always delighted when others read and enjoy it
LikeLiked by 1 person
That looks really interesting, thanks for sharing all the info. I’ve been thinking about trying to be more organic with feeds and fertilisers on my plot recently. It’ll be good to hear how you get on with this!
LikeLike
Thank you for your lovely comment – I have been trying to cut costs at the allotment. On our site, we try to recycle and reuse rather than buy new. To buy a wormery costs upwards of £100 but my little ones cost £22 and I had a fun afternoon making it! I will be posting updates after a few days once the worms have settled in!
According to my friend Rachel, the compost is very strong. So it’s best to put a little bit into a pot and top up with normal compost. The sump (worm juice) is a brilliant fertiliser but again, it’s strong so you need to dilute it with water.
LikeLike
Yes, I think recycle and reuse really fits with an allotment ethos. I definitely like the sound of £22 homemade compared to £100 plus! The worms won’t care!
LikeLike
Absolutely! I found the plastic boxes discounted and rummaged around for the filling for the tower (newspaper, cardboard, kitchen scraps).
So many people on site are so creative with recycling things. Some of my favourite things include wellie planters, re-purposing our quail run into a broody box and Cliff making benches out of old railway sleepers.
LikeLike