Over the past few weeks (well, few months if I am being completely honest), I have been quietly working on a special project. Usually, I write about what I am doing each day but this project was a little different and I chose to wait to share it until it was done. It started off as a quick and easy project that could comfortably fit into a weekend’s work. As it turned out, it took much longer than expected but I am rather proud of the end result.

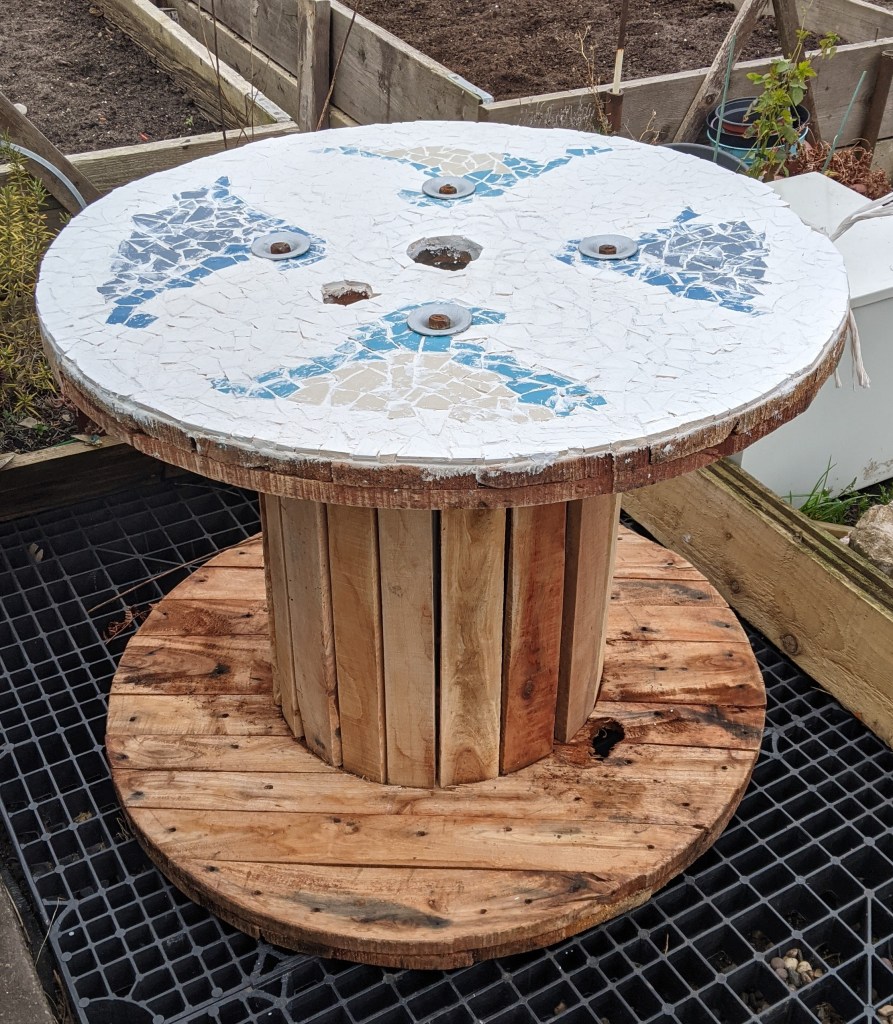
In February, one cold weekend, we picked up an old 3ft wooden cable reel. I had been hankering after one of these for ages, ever since I saw some online. But it has taken a year to be able to get hold of one that is in reasonable nick and didn’t break the bank. The man we bought it from had taken it apart to start his project but ran out of steam. Whilst this was great for sanding and painting, it does leave me to work out how to reassemble it. Without instructions. Maybe this is where I should have taken my second thoughts first…
Browsing the internet for ideas when insomnia strikes can have it’s perks, especially when you come up with an idea. Why not use broken tiles to create a mosaic for the top of the table? Buying the tile adhesive wasn’t too expensive and surely I would be able to find as broken tiles somewhere. Rapidly, I ordered the adhesive from Screwfix and scoured Facebook marketplace for tiles. There were lots but all in good condition, spare boxes of complete tiles. It seemed a shame to smash them and with an average cost of £40, this seemed excessive for an allotment table! Eventually, I found a lady in Nantwich who was giving away a box of broken white tiles. Perfect! I messaged and arranged to pick them up. At the same time, a lady nearer home was selling two boxes of white tiles for a fiver. I snaffled those too. All that was left was to source some blue tiles. I tried a couple of tile shops with no luck – lockdown strikes again!

I ended up wandering the tile aisles in B&Q, picking up a selection of sample tiles in a range of shades of blue and green. Lugging them home was interesting. My backpack weighed a ton and I had to stop on the way to pick up the tile adhesive too. Resembling an African land snail, I dragged myself home to wait for another delivery. After my husband finished work, we collected the two boxes full of broken tiles before picking up a wire brush and hammerite for the metal rods that hold the reel together. This was rapidly turning into rather a big project. Much bigger than I had originally planned. Oops!
The following Thursday I finally managed to get down to the allotment for a decent amount of time. I don’t know where the week has gone! My first job was to finish sanding down the top and bottom of the cable reels. This didn’t take too long but was made trickier by having to sand around the holes and nails in the wood. Next, I moved onto wire brushing the metal rods and washers. This didn’t take long but I added a layer of rust to my already dusty clothing. The final part of the preparations was to paint the rods with hammerite. Hammerite is a special metal paint designed to protect metal against rusting and now comes in a range of different colours. I chose silver only because I thought it would go well with the colours of the tiles I had chosen. With the rods and washers drying, I moved onto thinking about the design of the mosaic.

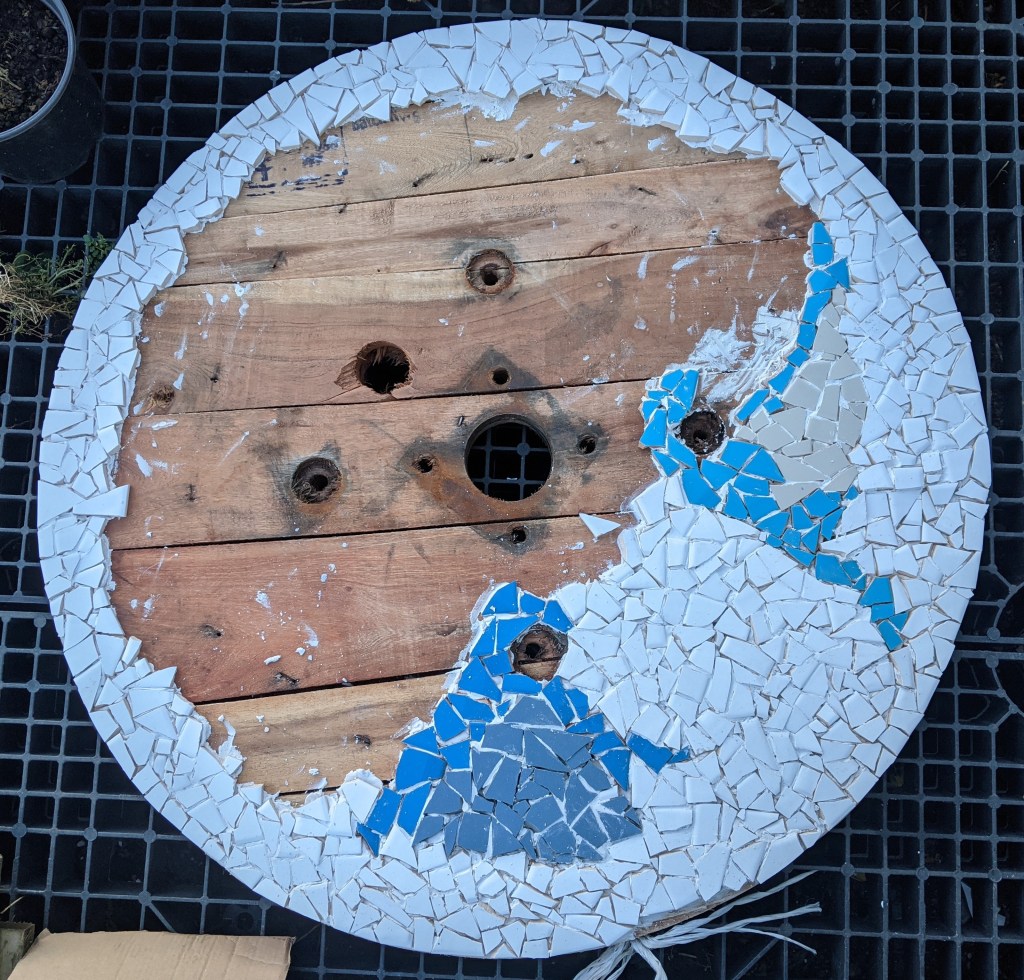
I confess I have never made a mosaic before or even tried tiling. I had no idea what I was doing beyond a vague vision in my head. Reading the instructions carefully on the tile adhesive bucket, I grabbed a hammer and a box of broken tiles and began. I decided to have a white ring on the outside of the table. My theory was, if I managed to make this bit work then I could slowly fill in towards the centre. Three hours later with my back seriously starting to complain, I had just about managed to finish the white outer layer of the mosaic. Standing up and having a look at it, I realised that this was going to take far longer than I had thought. Suddenly painting the table seemed like a much better idea. But it was too late now.

An hour later and I was cold and almost unable to move. I gave up. But I had worked out the design I wanted on the table top and had begun to make a start on it. I thought it looked pretty good considering! Clearly, I will need to go over it when the mosaic is finished to fill in the gaps with grout (another long job!) but for now, it would do!

Several days of rain had stopped me from doing the next section of the mosaic. There is literally no point in battling the rain. But on Monday, I managed to get down on a dry afternoon and completed the next wave and filled in the gap between both waves. After an hour my legs began to cramp badly so I set off to find something to sit on as I worked. Fortunately, I found a discarded plastic box which, when turned upsidedown, made a perfect seat.
Several weeks later, the shed upgraded and tidied, each time I opened up the shed, the unfinished table greeted me. So one dry afternoon at the end of March, I opened the second adhesive bucket and carried on. It was freezing cold. However, ending up as a human icicle after several hours wasn’t a concern now that we had our new stove. Each time I sat up and stretched, I added another couple of logs to the stove. As the hours melted away, I created the third wave and filled the gap between the previous one. As the grout was not entirely dry on the rest of the table top, I spent the last hour, filling in the gaps between the tile pieces. I used a damp cloth to wipe off any excess grout. Although I will need to scrape off the rest another day. Maybe I’ll wait until I finally finish the mosaic… If that ever happens!
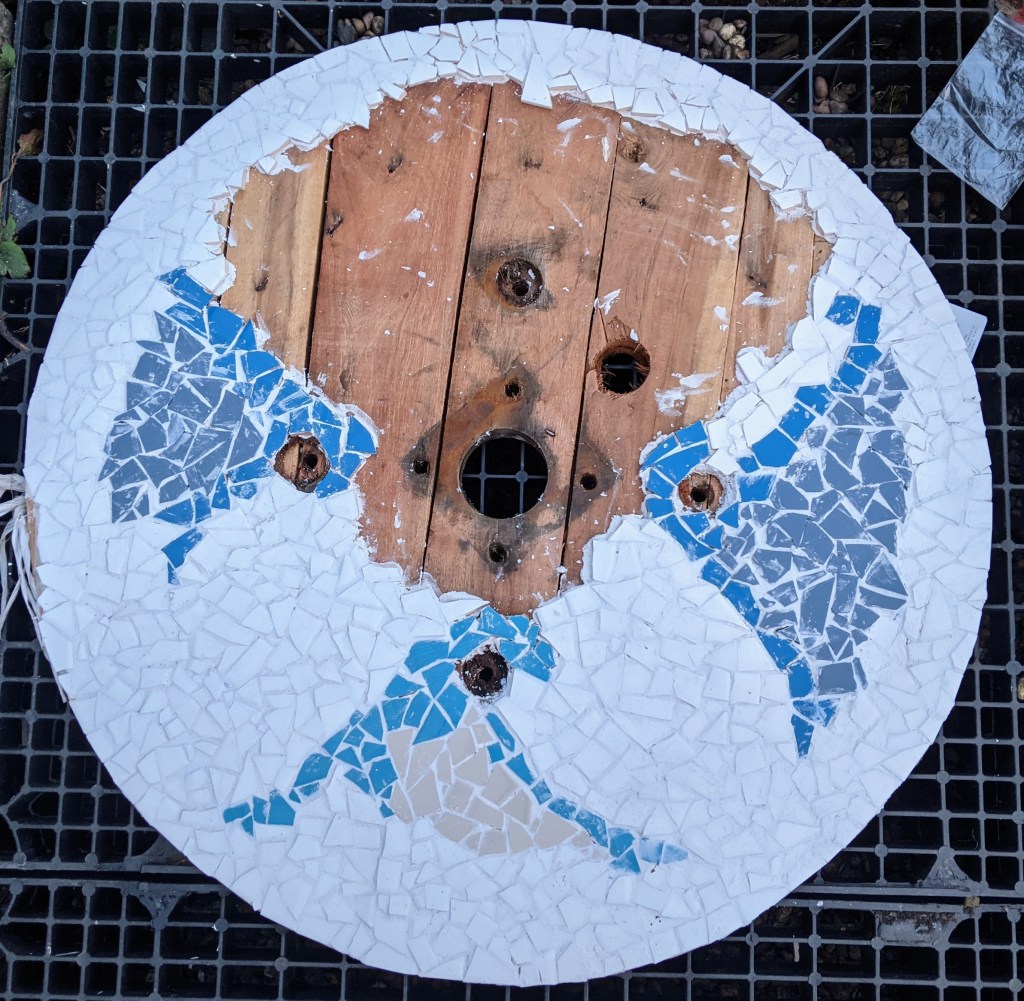
The last weekend in March was a mixed bag when it came to weather. I just about managed to complete the fourth wave and filled in between. I had discovered that keeping the stove going meant I had to keep sitting up which gave my back a rest at regular intervals!

The next day, I popped down to finish off the end of the mosaic. Putting on the stove to keep me warm, I made a start. By now I had a technique and it didn’t take me more than an hour to finish off the last section. Trying to tile around the central circle was difficult but I got there in the end! Rather pleased with how it looked, I went to fetch the base of the reel which I had left at the bottom of the plot. Rolling it up to the veranda, I balanced it on its side and dug out the metal rods, washers and nuts from inside the shed. Wiggling the rods through took some doing but it was simplicity itself compared to what was to come…

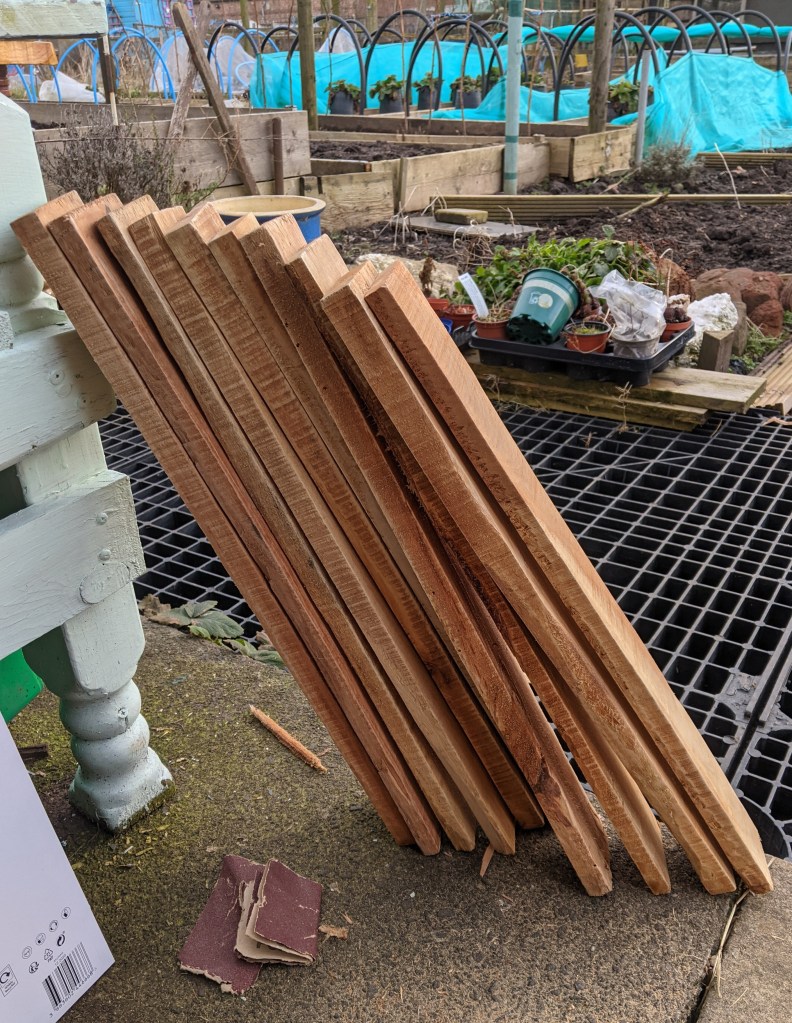
There seemed to be quite a lot of wooden slats to make the middle. Surely they wouldn’t all be needed? I had prepared for this task by watching a very short YouTube video which made it look ridiculously easy. Half an hour later, on the eighth attempt, juggling two large wooden circles that refused to stay in place with wooden slats regularly dislodging and falling out with a clatter, I swore that if I ever met the guy from the YouTube video, I would not be responsible for my actions! Straightforward assembly indeed! Now desperate, I resorted to brute force and ignorance. Armed with a hammer, I eventually got all but one of the slats into place. Then to my horror, I realised I would have to turn the table onto its base. I was absolutely certain that several of the slats would fall out as I tried to move it. I wasn’t disappointed. Two fell out instantly. A third followed as I wrestled the table upright. Taking my frustration out with the hammer, I jammed them back into place.

The table top needs some cleaning and tidying of the grout and the rest of the wood needs treating – I am thinking of teak oil to give it a nice colour. But after over two months of on/off work, the table is complete!
Now onto the next exciting and equally massive project…

Well done!
LikeLiked by 1 person