Over the past year I have been thinking about how to get power to the shed. The amount of time I spend down on the plot in the spring and summer would surely warrant the expense of a solar set up? It would mean we could have a light in the shed during the winter, the ability to charge phones (useful when taking and editing photos for a blog…) and even run an ancient laptop. Why not sit and write whilst enjoying a beautiful view without the fear of the laptop dying halfway through a sentence?

So over the past three weeks, I have actively been searching for a large solar panel. Fortunately, I found a 250W one in Congleton, a mere 20 minute drive from home. We collected it from a farmer and although I had measured the car up beforehand, I was still worried it might not fit. It was with am enormous sigh of relief when it slid in, with millimetres to spare. Instructing my husband to drive very carefully so as not to crack the glass, we drove back to the allotment and put it safely in the shed.
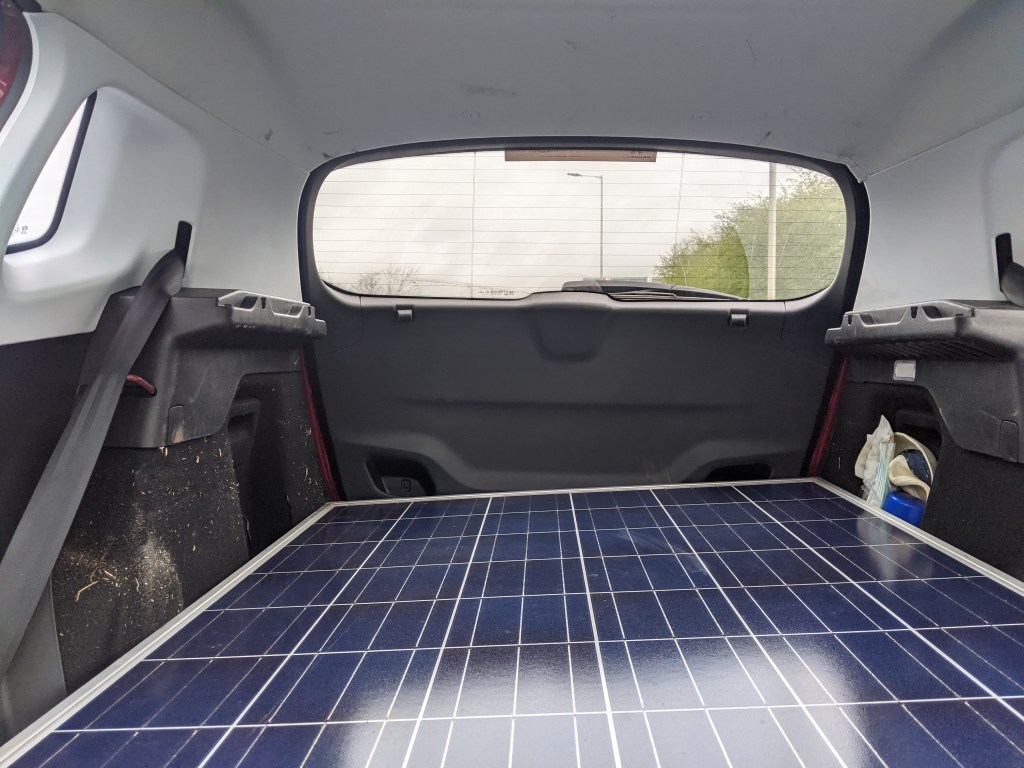
Before we could do anything else, I needed to make sure the small leaks in the shed roof were fixed. There are a few points where water tends to drip slightly during heavy showers. Using a ladder, a claw hammer and a tube of sealant, I took out the nails one at a time, covered the hole with sealant and hammered it back into place. For good measure, I covered the head of the nail with sealant too. The next few days we had no rain whatsoever, so I await a heavy downpour to check if my repairs have worked!

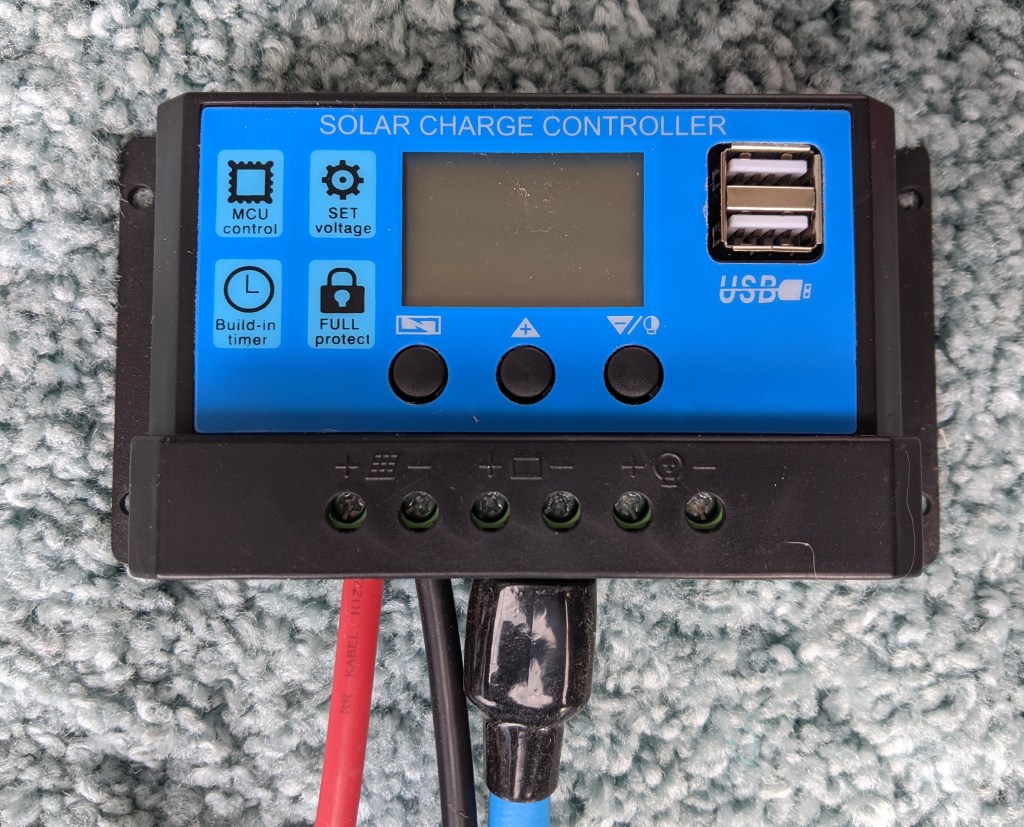
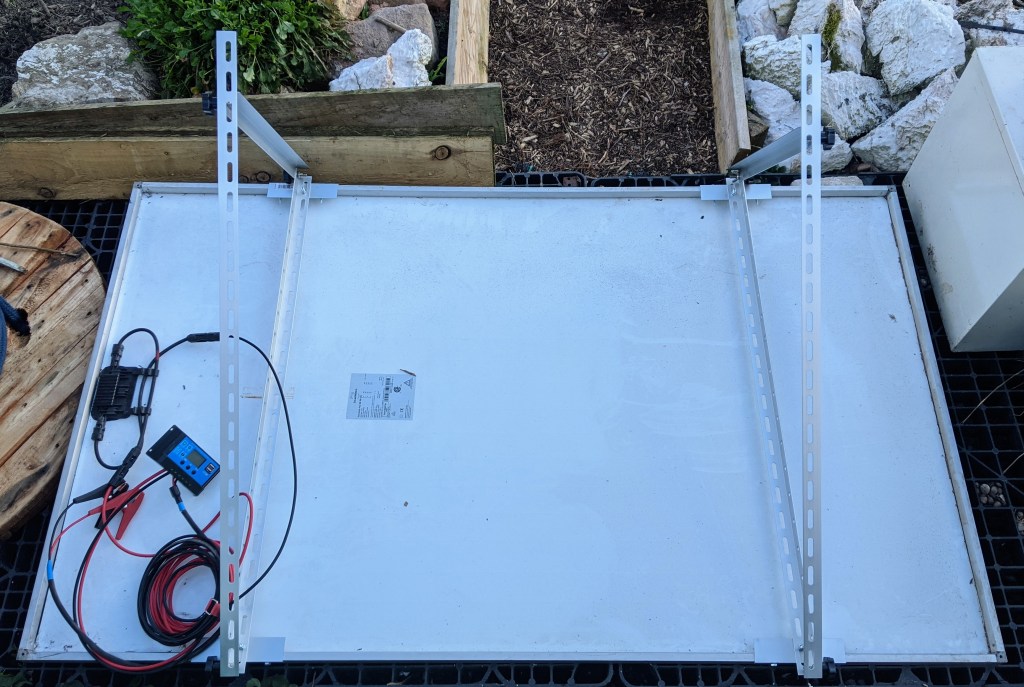
Meanwhile, with the help of my father (who is an electrical engineer by trade), I sourced a solar controller, various cables, a 500W inverter and a large second hand car battery. The theory is simple enough: the solar panel runs power through MC4 connectors to the solar controller. The solar controller limits the amount of power sent to the battery to stop it over charging. The inverter is attached to the battery to power whatever is needed. Surely this would be a simple walk in the park?

In some ways, yes it was. Using crimpers on the cables coming from the panel and attaching the MC4 connectors was simple when done slowly, checking everything before doing anything. Ditto for connecting the solar controller to the panel and the battery. All seemed to be going well until I began to think about mounting the panel.
Solar panels are usually attached by aluminium rails to ground arrays or on rooftops. But smaller panels can be attached using a tilt mount. These are especially useful for when you have a north facing shed roof. The panel can be raised at an angle to face southwards which ensures the panel has the largest amount of sun as possible. Scouring Facebook marketplace, I found a tilt mount for less than £30. When it arrived, I discovered it was designed for 100-150W panels. Oops! Back online and I found a much larger tilt mount which would fit my panel and waited impatiently for several days for it to arrive.

As soon as it arrived, I ran down to the shed with it. I knew how to attach it thanks to a number of YouTube instructional videos. All I had to do was to bolt on four z brackets to the solar panel frame then more bolts to secure the mount. What could be more straightforward? Turning the panel over, I looked for the mount holes. Nothing. No holes anywhere. Temporarily stumped, I searched online and bought some special solar panel brackets which promised to secure the panel even in high winds. The next day, they arrived, and to my horror, also required mount holes in the panel frame! Increasingly irritated at seemingly failing at the easiest part of the build, I combed the internet for an explanation. Eventually, I discovered that 2.0 SolarWorld panels like mine had no mount holes – on purpose! Apparently, you should use solar clamps to secure these panels in position. More research showed that the clamps only worked on rails, not on a tilt mount. Briefly, I considered using rails but remembering the north facing shed roof, I quickly abandoned the idea.
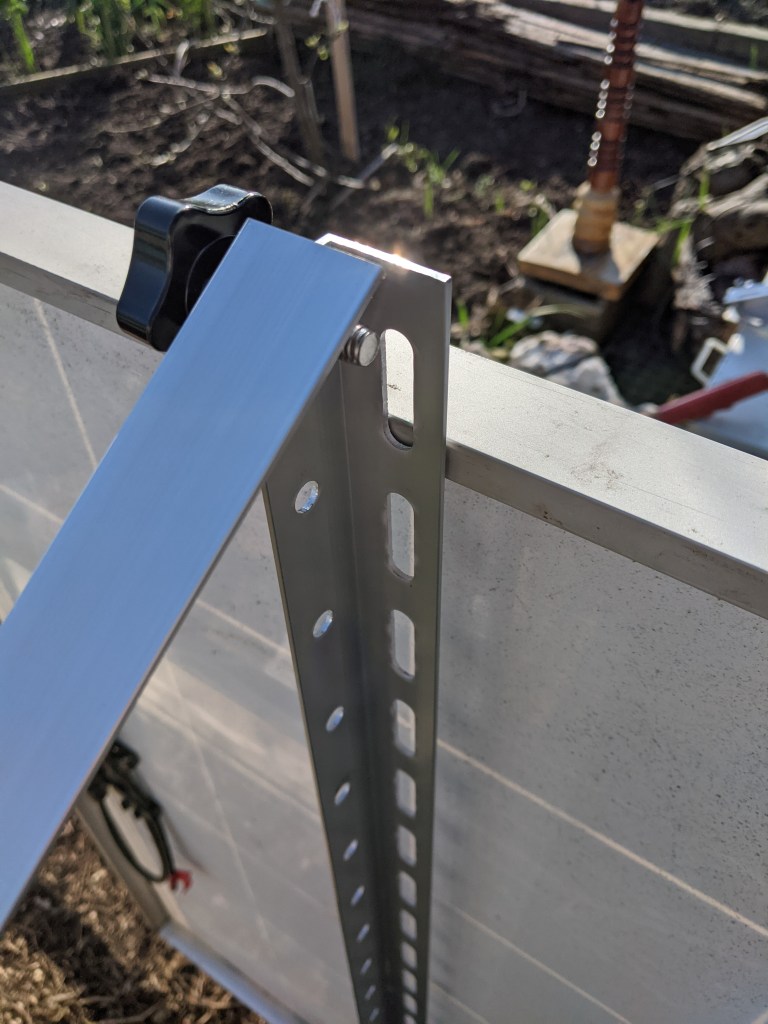
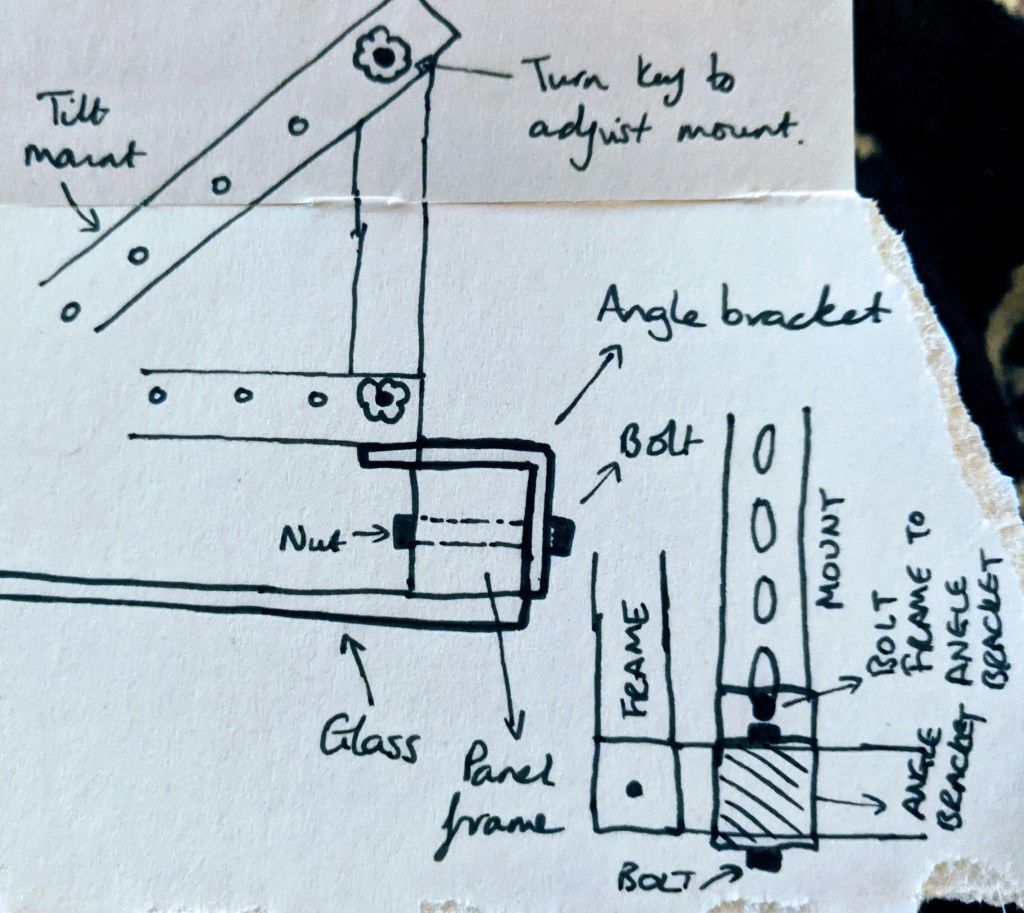
But what if I used something else as a bracket? I had found a few YouTube clips showing how to drill through the frame to attach brackets. A flash of inspiration hit me – uneven angle brackets would surely work? The short part attached to the outside of the frame with the longer part covering the top of the frame creating an overhang which I could bolt the mount to. It might just work. Pondering it a bit more, I checked that B&Q would have what I needed (they did!) and I made a plan to pick some up the next day.
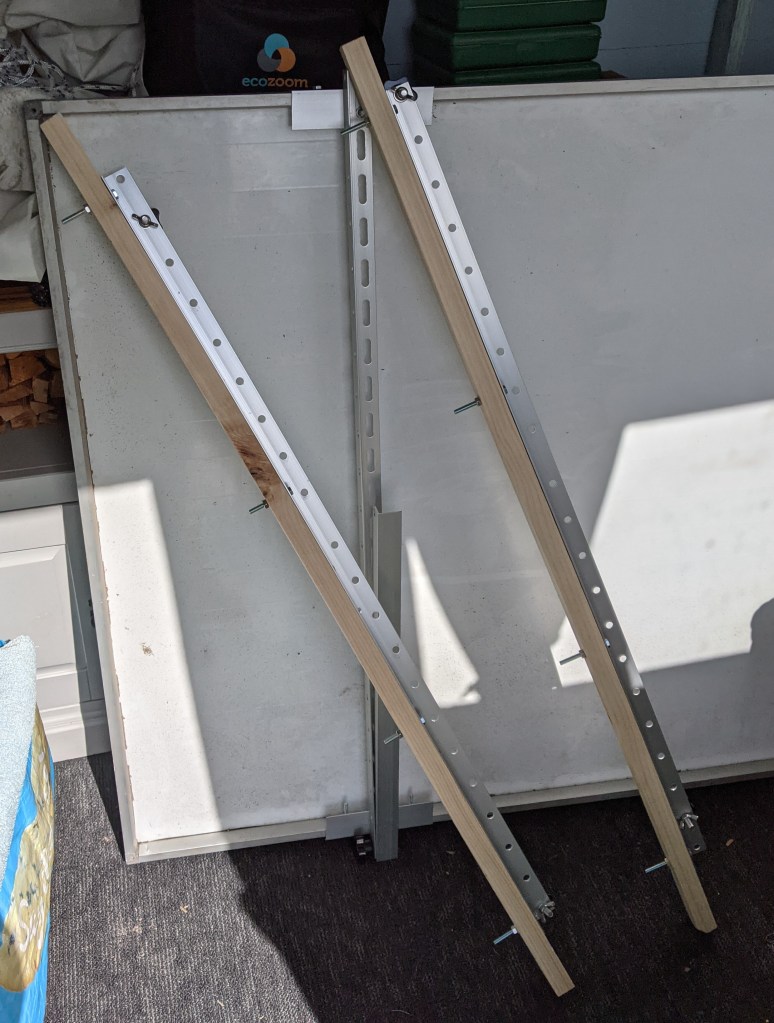
Easter Monday dawned bright but with a cold wind. Not ideal for putting up the solar panel but no matter. Today was the day! Arriving in B&Q we found the angle bracket section. No uneven brackets and even worse, no brackets that were short enough. Beginning to despair that this project would ever be possible, I noticed a section with aluminium angle profiles. Those might do the trick! More disappointment followed when the one size I needed was sold out. Cursing under my breath, I got out my phone and began to search any shops that might have anything useful in stock. Wickes had an angle profile and in the right size and, more importantly, in stock! I immediately ordered one for click and collect, rounded up my husband and we dashed home to get the car. Once I had the profile, I ran to the allotment, working out how long each bracket would need to be.

I measured out 6″ for each bracket and using a new saw, quickly got them all to size. There was some profile left which was useful in case I made a complete mess of a bracket. Next, I drilled two holes in the shorter side of the profile, these would be used to bolt the panel to the bracket. Drilling the holes into the side of the panel frame took some nerve. By drilling holes, I would be voiding the warranty. But I pressed ahead and got all the holes drilled and the brackets in place.

The final part of attaching the tilt mount required drilling a hole in the top of the bracket and bolting them together. Using two thick pieces of wood on the back of the panel, I cautiously drilled the holes. The wood provided protection for the glass if the drill slipped. Slowly, I lined up the mount in the middle of the bracket and began to attach the bolts. To my surprise it worked well although the bolts need proper tightening tomorrow with a couple of spanners.
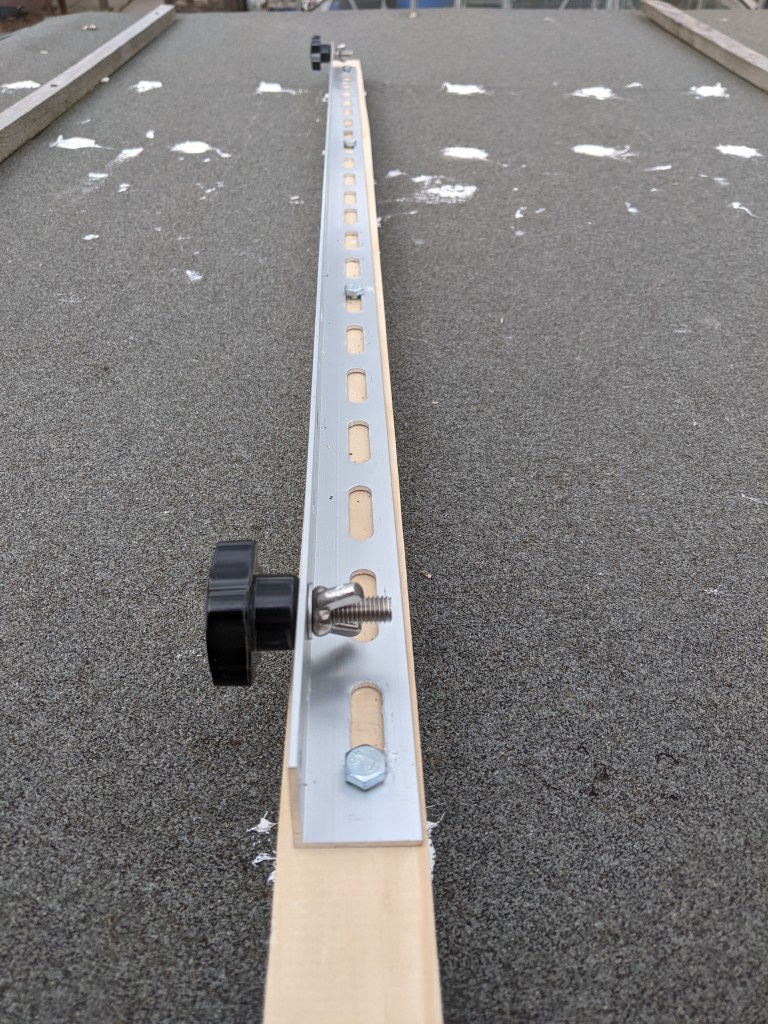
In order to securely mount the solar panel on the roof, I had also bought a small wooden beam. This will be cut to size and placed on the ceiling of the shed. The bolt will then go through the mount, the roof and the beam to ensure the solar panel is secure. On Tuesday morning I walked down and prepped the wooden strip by cutting it in half and drilling 4 holes to attach the base of the mount. Checking the position of the holes, I dropped in the bolts. The wind was getting really strong and there were occasional flurries of snow so I decided to wait before putting the panel up. As I waited, I tightened up the bolts on the brackets and the top part of the mount ready for putting it up another day.
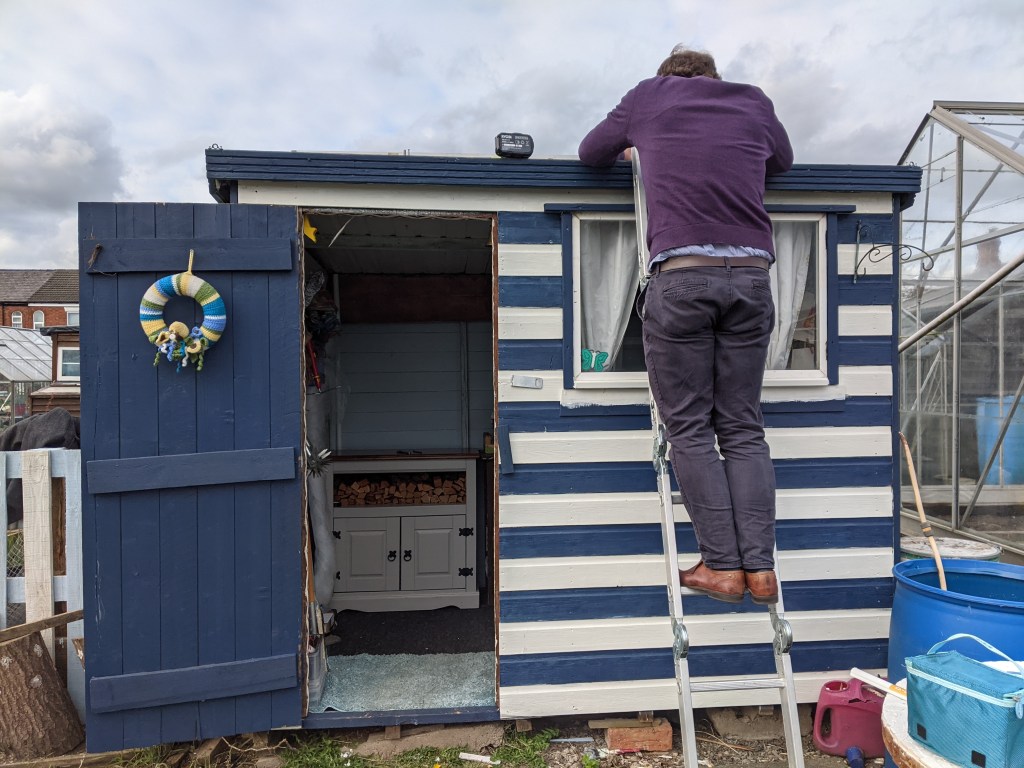
On Wednesday, I managed to attach one of the mounts to the roof. The drilling through the roof was rather terrifying! What was especially terrifying was the ease which the drill went through it. It was unnerving! Realising I couldn’t tighten the bolts without being simultaneously on the roof and in the shed, I waited for my long suffering husband to arrive.
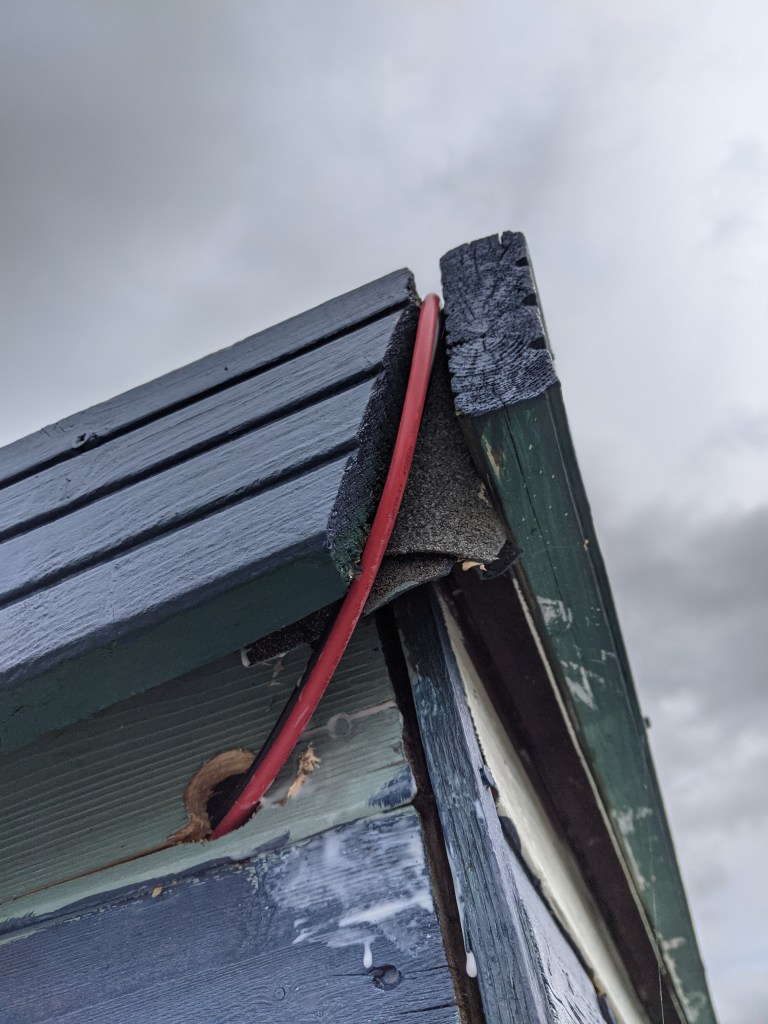
Whilst I was waiting, I put up the solar controller on the inside of the cabinet door. Then I threaded the wires from the solar controller out the back of the cabinet and up the wall of the shed. I used a D line to keep the wires tidy and out of the way. When the panel is on the roof, I can drill a hole through the wall to run the cables up to the panel on the roof.

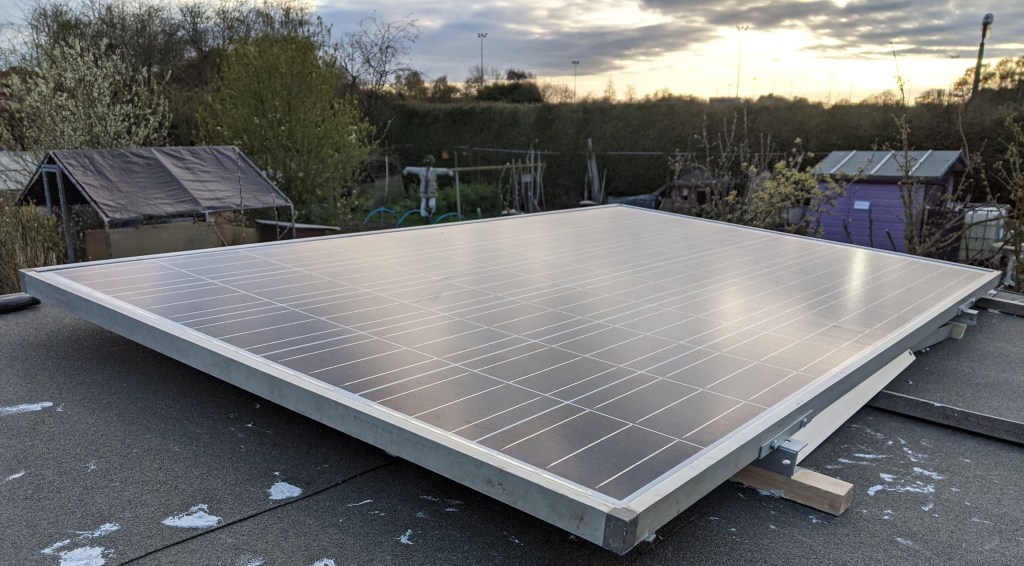
Once my husband arrived, he grabbed a spanner and held the nuts in place on the ceiling while I balanced on the ladder wrestling with the bolt from above. Moving on, between us we lugged the panel onto the roof. That was a nerve wrecking few moments when he was up the ladder supporting one end on the roof whilst I was at full stretch underneath it, unable to push it any higher. It’s in these moments that your brain is unhelpful and begins to list all the things that might possibly go wrong in this situation. The obvious one is the panel smashing on the ground, closely followed by the panel smashing onto my head. As these increasingly horrifying scenarios were running through my head, my husband, with one great heave, managed to get the entire panel safely onto the roof. We both breathed an enormous sigh of relief. Once it was up, I set up the other side of the tilt mount and bolted it through the roof and into place. Shifting the solar panel onto the mount correctly involved my husband on one side of the shed up on a ladder pulling at it, with me on another ladder on the other side pushing the panel. Then we found a problem. The mount on the right side was offset from the left by less than half an inch. It was enough to mean putting in the last few screw bolts would be impossible without moving the entire right side of theount and drilling more holes in the roof. I refused to make anymore holes in the roof on principle. Never has a builder seen a slight error on a roof and thought, I’ll fix it by drilling more holes in the roof. What could possibly go wrong with more holes? By now both of us were freezing and losing sensation in our hands. Grabbing the drill, I fixed the misalignment issue by making a new hole on the left mount and screwed in the bolts.
With the final bolts in place, all that was left was to put the props into place to make the tilt work. The panel weighed a ton and by now we were both so cold we gave up and left it for tomorrow. Now it’s up, I was quite surprised at how much roof was still visible – I had thought it would cover the entire roof. Looking at the space remaining, I dithered with the idea of getting a smaller 100W panel to fill in the gap before I remembered the difficulty of getting the current panel up. Maybe next year…
Onto Thursday and come hell or high water, the project was going to be finished today! I borrowed a drill bit from Cliff and worked out where to drill the hole in the side of the shed. Taking a deep breath, I made the hole and threaded the cables through. The next task was to unclip the wires from the back of the panel. This was made more complicated by the panel being mounted. Using a piece of rope and a stick, I managed to lasso the MC4 connector and tease it out from the clips. Joining the two end of the connectors was simplicity itself and I dashed inside the shed to check the solar controller.
The solar controller wasn’t registering the panel. Frustrated, I checked over the cables going into it and the battery connection. Nothing was wrong. Cliff swung is head in and asked how it was going. I told him that the controller wasn’t recognising the panel and he was good enough to point out the sun had gone in and heavy cloud had set in for the day! In my enthusiasm for getting the job done, I had forgotten that we need a high level of daylight to make it work. Ho hum. Just incase it was something else, I messaged my dad and asked if there could be any other less obvious reasons why the controller wasn’t recognising the panel. The wind was quite high again so I left the panel flat on the roof which may also contribute to the solar controller problem.

But aside from the need for sunshine, some tilting of the panel and possibly a few minor tweaks, the shed has power! It’s been a long project which has taken every spare moment of my time to do but I feel a huge sense of achievement as I sit in the shed, knowing that I can spend hours on site without worrying about the radio or anything else running out of power.


How clever you are! I’d pack some steel wool around the cable going into your shed, just to keep out critters! I’m certainly impressed with your skill and perseverance.
LikeLiked by 1 person
Thank you very much! I am rather proud of it although I suspect there may have to be some tweaks to get it running more efficiently. I will have a look into steel wool – thanks for the recommendation!
LikeLike